The Necessity of Upgrading Steam Deck Storage
The Steam Deck is undoubtedly a groundbreaking innovation in the gaming sphere, condensing powerful PC-grade performance into a portable handheld form factor. Nevertheless, the device's stock storage capacity is often insufficient for many heavy gamers. The initial base model came with just 64GB of eMMC storage; the current base models have been upgraded to 256GB NVMe PCIe 3.0 x 4 SSDs, while the newer OLED version only offers 512GB or 1TB options. Given the escalating storage demands of today's titles—for instance, Kingdom Come: Deliverance 2, scheduled for release in February 2025, requires a staggering 100GB, consuming nearly 40% of the standard Steam Deck's capacity—it has become a common necessity for users to seek a higher-capacity solid-state drive replacement.

If you are unfamiliar with disassembling electronic devices, this task may seem daunting at first glance, but the process is quite straightforward in practice. This guide will walk you through the entire procedure, from selecting a suitable replacement SSD to redeploying your favorite games on your newly upgraded Steam Deck.
Thorough Preparation Before the Upgrade
Before undertaking any hardware upgrade or repair on the Steam Deck, it is crucial to take data backup measures to prevent the accidental loss of game progress, saves, or custom configurations. Although the Steam platform automatically synchronizes some game data, this does not cover non-Steam games, emulator files, or custom settings. To ensure comprehensive safety, you should manually copy important files to a MicroSD card, external storage device, or cloud service, or use cloning software like Clonezilla or Balena Etcher to create a full image of the internal drive. Before commencing any hardware changes, you must confirm that the backup is complete and accessible.
Anyone planning to open the Steam Deck's casing should first consult the device's user manual and strictly follow standard Electrostatic Discharge (ESD) safety procedures. Before starting, it is advisable to discharge the battery below 25%. Furthermore, Valve officially recommends entering the Steam Deck's BIOS settings and enabling the Battery Storage Mode. Once these preparations are complete, completely power off the Steam Deck, disconnect all cables, and remove any currently inserted MicroSD card.

Disassembling the Steam Deck Casing
The first step requires a Phillips screwdriver to remove the eight screws on the Steam Deck's back cover. Note that the screws closer to the center are shorter than those on the periphery. It is recommended to store the different lengths of screws separately to avoid damaging the threads or internal components by using the wrong screw during reassembly.
After all screws are removed, you can begin to unclip the back cover. A professional prying tool may be necessary to assist in this operation. If you encounter difficulty, try starting from the top or bottom edges of the device. Once all clips are released, the back cover should come off easily.
The next steps differ slightly depending on your Steam Deck model. The process is slightly more complex for the base model: it has a metal motherboard shield with a piece of foil tape covering a hidden screw. Try to avoid tearing this tape; it is best to use tweezers or similar delicate tools to carefully peel it back so that it can be reused later. The OLED Steam Deck omits this hidden third screw, substituting it with a black plastic cover. Unscrew the screws securing the motherboard shield (again, the hidden screw on the base model has a different thread length and should be stored separately), and then cautiously remove the shield. You may find it lightly adheres to the thermal pad underneath.
The Solid-State Drive Replacement Process
The motherboard is now fully exposed. First, you must disconnect the battery: carefully slide the battery cable using the pull tab, then gently detach it directly from the motherboard connector. Next, unscrew the screw holding the SSD in place. Again, carefully separate and store this screw from the others. Once unscrewed, the SSD will pop up slightly. Grasp the end of the drive and pull it out of the M.2 motherboard slot. The original SSD is wrapped in an ESD shielding cover, which the new drive will also require. Carefully slide the shielding cover off the old drive (tweezers may be needed for this delicate work).
Fit the shielding cover tightly onto the replacement SSD. The cover must fit snugly for the drive to be properly inserted. As long as you choose a compatible single-sided M.2 2230 specification SSD (but remember, any newer drive will run at the NVMe PCIe Gen 3 x 4 speed supported by the Steam Deck). Fully insert the new drive into the SSD slot, gently press it down until flat, and secure it with the correct screw (this should be the shortest, the 3.8mm screw).

Reassembling the Steam Deck
The reassembly process is simply the rever-se of the disassembly. Gently reinsert the tab of the battery cable to reconnect the battery. Place the motherboard shield back into position. Note that there are several small tabs on the shield that need to be accurately aligned and snapped into place to ensure the shield lies flat. Screw the shield back in, making sure to use the correct length for each screw. If your model has the foil tape, carefully smooth it back over the third screw. Replace the Steam Deck's back cover, which should snap into place, ready for the screws. Finally, screw the back cover on, remembering the shorter screws go internally, and the longer screws go around the perimeter.
Preparing and Installing the System
You have now completed the most critical hardware operations! The next step is installing SteamOS on your new SSD. In addition to the Steam Deck, you will need another computer, a USB drive larger than 8GB, a USB-A to USB-C adapter, and a wired keyboard.
Download the Steam Deck OS recovery image from Valve's official website. Simultaneously, download the corresponding writing software (such as Balena Etcher) based on your computer's operating system, and write the OS image to the USB drive. Use the adapter to plug the USB drive into the Steam Deck.
To boot the Steam Deck, press and hold the Volume Down button and the Power button. If successful, you will hear a chime, and the device will enter the Boot Manager. Assuming the boot drive works as expected, you will need to connect a keyboard to select the boot options. This process can take a significant amount of time, and you must be patient; each phase may require waiting up to half an hour with no visible sign of progress. If you suspect the process is stalled, you can reboot into the Boot Manager and try again.
Once the desktop OS eventually loads, you will see four options. Select the "Reinstall Steam OS" option to begin installing SteamOS on the new SSD. Remember that this installation process will also take a considerable amount of time.
After the installation is complete, power off the Steam Deck, then power it back on. The initial boot time may be much longer than usual, but upon success, it will automatically load into the Steam interface. Mission accomplished! Now, you just need to re-download and install your favorite games to enjoy your upgraded storage space.
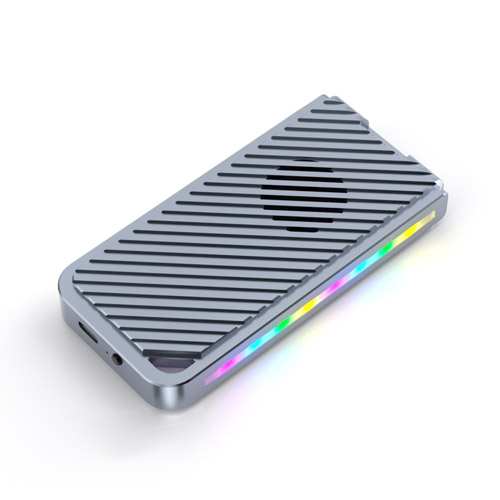
Enhancing Connectivity: The 6-in-1 Smart Docking Station (Key Features)
To unlock the Steam Deck's potential as a desktop/console, the 6-in-1 Smart Docking Station is highly recommended.
Core Selling Points: